Difference between revisions of "Assembling the rpi+rpi ui case."
| Line 6: | Line 6: | ||
We find the following procedure the easiest.... |
We find the following procedure the easiest.... |
||
The terms front/back/top/bottom/left/right refer to the position of the assembly with the screen on top and the switches facing you. So the front is the side with the audio and video connector, back is where the HDMI connector lives. |
The terms front/back/top/bottom/left/right refer to the position of the assembly with the screen on top and the switches facing you. So the front is the side with the audio and video connector, back is where the HDMI connector lives. (as depicted in the picture on the right). |
||
Screw two M3x10mm screws into the two standoffs. Next place these into the key-hole-shaped holes in the rpi_ui. After inserting the screw you can tighten the standoff onto the PCB by turning it. Don't tighten them too strongly. (so far I've always been able to unscrew them without trouble, but you want to be able to slide them sideways because you can't reach the screw on top.) |
Screw two M3x10mm screws into the two standoffs. Next place these into the key-hole-shaped holes in the rpi_ui. After inserting the screw you can tighten the standoff onto the PCB by turning it. Don't tighten them too strongly. (so far I've always been able to unscrew them without trouble, but you want to be able to slide them sideways because you can't reach the screw on top.) |
||
| Line 17: | Line 17: | ||
(*) or M3x15. |
(*) or M3x15. |
||
= V2.0 and older = |
= V2.0 and older = |
||
Revision as of 16:36, 17 January 2014
V2.1 and newer
We find the following procedure the easiest....
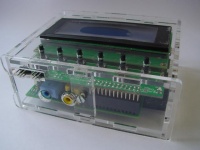
The terms front/back/top/bottom/left/right refer to the position of the assembly with the screen on top and the switches facing you. So the front is the side with the audio and video connector, back is where the HDMI connector lives. (as depicted in the picture on the right).
Screw two M3x10mm screws into the two standoffs. Next place these into the key-hole-shaped holes in the rpi_ui. After inserting the screw you can tighten the standoff onto the PCB by turning it. Don't tighten them too strongly. (so far I've always been able to unscrew them without trouble, but you want to be able to slide them sideways because you can't reach the screw on top.)
Next mount the rpi_ui onto the raspberry pi.
Next you can use the 4mm standoffs and the M3x12 screws (*) to bolt the bottom plate to the raspberry pi and rpi_ui. Sometimes you'll have to nudge the big standoffs a bit to get the to align enough with the holes in the 'pi. Next put the two small keys (the ones without the circular cutout for the TV connector) into the bottom. Next place the top plate on the rpi_ui and fit it into the keys. Now you can mount the back plate and fixate it with the two M3x6 screws. Don't tighten them all the way. At this point some play is necessary. Now insert the front key, the one with the cutout for the TV connector between the top and bottom plates in the front.
Next the sides can be mounted, followed by the front. Fixate the front and then tighten all three screws. But be careful the acrylic is easily damaged by tightening the screws too far.
(*) or M3x15.
V2.0 and older
To assemble your rpi+rpi_ui case you the following procedure is the easiest.
Use the screws, the MDF spacers, and the long bolts to connect the raspberry pi to the baseplate of the case. Add the rpi_ui onto the raspberry pi with the spacers. Alas, you cannot do this if you have a V1 raspberry pi. There are holes in the rpi_ui display to bolt the display onto the long nuts that we've just placed. Alas, it is impossible to get a screw through the hole below the display. And the other screw-hole interferes with the jumper block that might be present there. You can chose to put just a short piece of M3 thread into the hex pole, so that at least the position is fixed. In case you want the jumper block installed, you can cut off the side of a nylon M3 bolt to make it fit next to the jumper block. (If you want to do this, you have to screw the nut to the rpi_ui first, and only then add the rpi_ui to the raspberry pi and then finish screwing in the screw from the bottom for that position. )
Next we can start to assemble the case. Find the two small "lock" bits and place them into the bottom on the side that has the RPI's HDMI connector. Next slide the top of the case around the display and put the "lock" parts into their slots. Next add the side of the case which has the HDMI connector cutout. Take care to place it the right way around. Now you can add the screws to keep the lock parts in place. Please be careful: the plastic is not able to withstand the big forces you CAN apply with a screw. I recommend that you don't tighten the screws all the way. This allows for some play during the rest of the assembly. But even then, the case is already starting to get some form.
Next you need to add the lock on the side with the TV and audio connectors. The next step is to add the USB/ethernet side of the case. And the usb-power and SD-card side. Then the last side of the case slips on and can be tightened with the third screw.
Now you can finish tightening all the screws.
