Difference between revisions of "Blog 03"
| (2 intermediate revisions by the same user not shown) | |||
| Line 125: | Line 125: | ||
When you do i2cdetect as above you will get the same result but than without the 4a visible: |
When you do i2cdetect as above you will get the same result but than without the 4a visible: |
||
modprobe i2c-dev |
sudo modprobe i2c-dev |
||
i2cdetect -y 1 |
sudo i2cdetect -y 1 |
||
but then without the 4a displayed on your screen. |
but then without the 4a displayed on your screen. |
||
| Line 139: | Line 139: | ||
Now it is fixed we can explore the things we can do with the Raspberry interface! |
Now it is fixed we can explore the things we can do with the Raspberry interface! |
||
Note: |
|||
At I2c the values are in hexadecimals and get divided by two. That explains why 94 is 4a in i2cdetect. |
|||
If you want to change an address with an hexadecimal letter you can use capital and lower case letters. |
|||
Go to [[Blog 04]], where I will make it possible to use the Raspberry interface as clock. |
Go to [[Blog 04]], where I will make it possible to use the Raspberry interface as clock. |
||
Latest revision as of 14:36, 30 November 2015
Hello,
I wanted to make it possible to show the temperature + time on a Raspberry Display. Before that I am going to try other little things so that I can get some experience. What I am now going to make possible is that text that I write in the shell as code will be printed on display.
( So that I know how to print text on the display )
For getting it to work I first had to get the latest BitWizard tool.
git clone https://github.com/rewolff/bw_rpi_tools.git
After a reboot add i2c in the group
reboot
For adding user pi to group i2c:
sudo gpasswd -a pi i2c
To look if it is added:
groups
At my it gave the result:
pi adm dialout cdrom sudo audio video plugdev games users netdev gpio i2c spi input
(Your list can of course be bigger or smaller. If it at least has the i2c everything is fine)
sudo -s
This code is for getting in the root, so that I don't have to type: sudo any more.
This is a handy command because many commands need sudo.
apt-get install i2c-tools
To install the i2c-tools you downloaded.
To make the raspberry in boot modes:
cd /boot
/boot/config.txt
nano config.txt
In the config.txt you have to remove the # from:
#dtparam=i2c_arm=on
( you have to scroll down to find it )
When you then reboot the raspberry he will directly use the code. With the code he then knows he I connected to the i2c display. (To reboot you just have to type: reboot as I said before)
To finally look when rebooted if he actually can see him:
sudo -s
i2cdetect
To check if it works. I will look if it show the location of the i2c.
modprobe i2c-dev
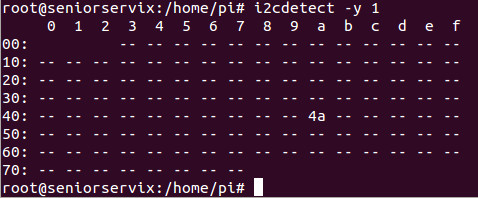
i2cdetect -y 1
Which should give as result:
reboot if it doesn't appear this can happen if you didn't activate the right code. If that doesn't help go to: "Change A: X to A: 94"
cd bw_rpi_tools/
cd bw_tool/
make
make install
cp bw_tool /usr/bin
These steps are for to install the bw_tool
( If you have a Raspberry pi 1, you have to replace /dev/i2c-1 with /dev/i2c-0 )
To write the text:
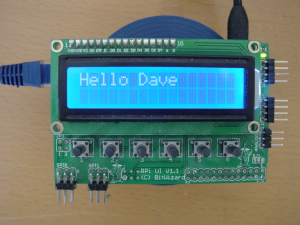
bw_tool -I -D /dev/i2c-1 -a 94 -t 'Hello'
bw_tool -I -D /dev/i2c-1 -a 94 -t ' Dave'
To remove all the printed text from the screen use the code:
bw_tool -I -D /dev/i2c-1 -a 94 -w 10:0
(for other commands go to the the wiki from the user interface:
Read example: In write ports: If you have 0x13 – set backlight ( b has to be after the code to say that it is in byte )
you should type:
bw_tool -I -D /dev/i2c-1 -a 94 -w 13:90
To give a high backlight
bw_tool -I -D /dev/i2c-1 -a 94 -w 13:10
To get a really low backlight.
So now I have printed my first text on the raspberry display. Later I want to get with these the possibility to get a temperature visible.
Change A: X to A: 94
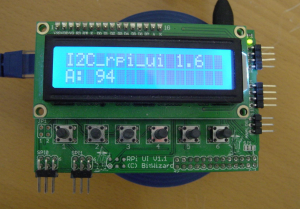
I once experienced that rebooting didn't help for me getting to see A: 94. On my Display was the text visible: I2C_rpi_ui 1.6 A: 1
On the image you can see how it normally has to look like.
If you have A:1 you have to write:
-a 1
instead of:
-a 94
Example:
bw_tool -I -D /dev/i2c-1 -a 1 -t "Hello, Dave."
When you do i2cdetect as above you will get the same result but than without the 4a visible:
sudo modprobe i2c-dev
sudo i2cdetect -y 1
but then without the 4a displayed on your screen.
You can change A: 1 to A: 94 with these commands:
bw_tool -I -D /dev/i2c-1 -a 0 -w f1:55 F2:aa f0:94
After this command: remove and connect the display.
bw_tool -I -D /dev/i2c-1 -a 94 -W 14:0
The above command is to reconnect the display.
Now it is fixed we can explore the things we can do with the Raspberry interface!
Note: At I2c the values are in hexadecimals and get divided by two. That explains why 94 is 4a in i2cdetect. If you want to change an address with an hexadecimal letter you can use capital and lower case letters.
Go to Blog 04, where I will make it possible to use the Raspberry interface as clock.


