Difference between revisions of "Blog 12"
(→BETA!) |
|||
| (14 intermediate revisions by the same user not shown) | |||
| Line 1: | Line 1: | ||
== |
== Alarm Menu == |
||
This time I made an alarm that you can control through to the push buttons. |
|||
Alarm |
|||
This time I am going to make an Alarm. |
|||
For this I will use: |
For this I will use: |
||
*Rp_ui_board |
*Rp_ui_board([[User Interface]]) |
||
*3pin earplugs ( I didn't have a speaker ) |
*3pin earplugs ( I didn't have a speaker ) |
||
| ⚫ | |||
I want to make it possible that you can change the alarm time through the pushbuttons. |
|||
| ⚫ | |||
Change alarm minutes |
Change alarm minutes |
||
Change alarm hours |
Change alarm hours |
||
| Line 23: | Line 20: | ||
This will show at start up the time given as alarm and the current time. |
This will show at start up the time given as alarm and the current time. |
||
* |
*CronTimeHH(Button 1) |
||
Here you can set the hour you want the alarm to turn on. |
Here you can set the hour you want the alarm to turn on. |
||
* |
*CrontimeMM(Button 2) |
||
Here you can set the minute you want the alarm to turn on. |
Here you can set the minute you want the alarm to turn on. |
||
| Line 40: | Line 37: | ||
How do you use my alarm? |
How do you use my alarm? |
||
When you start the script, you can |
When you start the script, you can use all the 6 buttons. |
||
When started up it will start at button 3. which is the button that shows the current time and time of when the alarm song plays. With button 1 you change the specific hour of when the song has to be played from the alarm. After button 1 pressed you change the hour with button 1 till 4. |
When started up it will start at button 3. which is the button that shows the current time and time of when the alarm song plays. With button 1 you change the specific hour of when the song has to be played from the alarm. After button 1 pressed you change the hour with button 1 till 4. |
||
1 = +1 |
1 = +1 |
||
| Line 101: | Line 98: | ||
sleep 1 |
sleep 1 |
||
done |
done |
||
For this I used the same script I explained in [[Blog 10]]. Only difference is that he opens other scripts. |
|||
[[File:AlarmMenuStart.jpg|300px|thumb|none]] |
|||
==Script TimeAndAlarm== |
==Script TimeAndAlarm== |
||
| Line 123: | Line 125: | ||
bw_tool -I -D /dev/i2c-1 -a 94 -t "Alarm " $(printf %02d $Hr)":"$(printf %02d $Min) |
bw_tool -I -D /dev/i2c-1 -a 94 -t "Alarm " $(printf %02d $Hr)":"$(printf %02d $Min) |
||
==Script |
==Script CrontimeHH== |
||
#!/bin/bash |
#!/bin/bash |
||
| Line 176: | Line 178: | ||
done |
done |
||
Like the AlarmMenu it uses the same script as from [[Blog 10]]. |
|||
Only what is special is: |
|||
echo $TimeOnhh > Hours |
|||
Which sends the given hour number to a folder named Hours. |
|||
== |
== CrontimeMM == |
||
This works the same as |
This works the same as CrontimeHH, only |
||
*TimeOnhh is changed to TimeOnmm |
|||
*Hours is changed to Min |
|||
[[File:AlarmMinSettings.jpg|300px|thumb|none|]] |
|||
==Script AcTime== |
==Script AcTime== |
||
| Line 195: | Line 206: | ||
bw_tool -I -D /dev/i2c-1 -a 94 -w 11:20 |
bw_tool -I -D /dev/i2c-1 -a 94 -w 11:20 |
||
bw_tool -I -D /dev/i2c-1 -a 94 -t "If times set" |
bw_tool -I -D /dev/i2c-1 -a 94 -t "If times set" |
||
The script read the minutes and hours given. |
The script read the minutes and hours given. |
||
| Line 228: | Line 238: | ||
bw_tool -I -D /dev/i2c-1 -a 94 -w 11:20 |
bw_tool -I -D /dev/i2c-1 -a 94 -w 11:20 |
||
bw_tool -I -D /dev/i2c-1 -a 94 -t "Time "`date +%T` |
bw_tool -I -D /dev/i2c-1 -a 94 -t "Time "`date +%T` |
||
Min="99" |
Min="99" |
||
Latest revision as of 11:47, 26 October 2015
Alarm Menu
This time I made an alarm that you can control through to the push buttons. For this I will use:
- Rp_ui_board(User Interface)
- 3pin earplugs ( I didn't have a speaker )
The options in the alarm menu:
Change alarm minutes
Change alarm hours
stop alarm music playing
Reset alarm time
Activating the alarm time given
show on display current time + time of the alarm.
- AlarmMenu
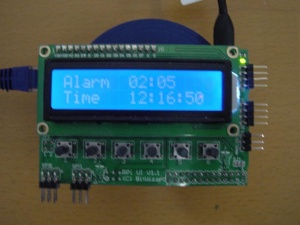
Main menu where you can select the scripts
- TimeAndAlarm(Button 3)
This will show at start up the time given as alarm and the current time.
- CronTimeHH(Button 1)
Here you can set the hour you want the alarm to turn on.
- CrontimeMM(Button 2)
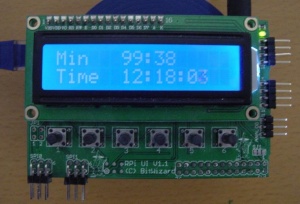
Here you can set the minute you want the alarm to turn on.
- AcTime(Button 6)
This will put the given hour and or minute in the crontab.
- StopSong(Button 4)
To stop the alarm song/sound that is now playing.( killall omxplayer.bin )
- ResetAlarm(Button 5)
This will reset the hour and minutes to 99 so that they won't be usable. ( because minutes goes from 0-59 and hours from 0-23)
How do you use my alarm?
When you start the script, you can use all the 6 buttons. When started up it will start at button 3. which is the button that shows the current time and time of when the alarm song plays. With button 1 you change the specific hour of when the song has to be played from the alarm. After button 1 pressed you change the hour with button 1 till 4.
1 = +1
2 = -1
3 = +5
4 = -5
If you then want to confirm you want to have the specific hour you selected you have to press 5. With button 6 pressed you leave the script. ( If you didn't press 5 before 6 the given time will not be remembered ) Button 2 is in the same way designed as button 1 outside of it instead changing hours it changes minutes. Button 4 is just 1 button press to stop the song that is currently playing. When you get out of this menu it should be possible that it can play an alarm song again the next day. Button 5 will reset the alarm time to 99, so that it will never play an alarm. Button 6 Is to activate the alarm.
Scripts AlarmMenu
#!/bin/bash

#BUTTON=CrontimeMM
#BUTTON=CrontimeHH
#BUTTON=AcTime
#BUTTON=StopSong
BUTTON=TimeAndAlarm
#BUTTON=ResetAlarm
bw_tool -I -D /dev/i2c-1 -a 94 -w 10:00

while true; do
 DETECT=`bw_tool -I -D /dev/i2c-1 -a 94 -R 30:b`

 if [ $DETECT  != "00" ]; then
   bw_tool -I -D /dev/i2c-1 -a 94 -w 10:00
 fi

 if [ $DETECT  = "20" ]; then
   BUTTON=CrontimeHH
 fi

 if [ $DETECT  = "10" ]; then
   BUTTON=CrontimeMM
 fi

 if [ $DETECT  = "08" ]; then
   BUTTON=TimeAndAlarm
 fi

 if [ $DETECT  = "04" ]; then
   BUTTON=StopSong
   bw_tool -I -D /dev/i2c-1 -a 94 -t "Audio mute"
 fi

 if [ $DETECT  = "02" ]; then
   BUTTON=ResetAlarm
 fi

 if [ $DETECT = "01" ]; then
   BUTTON=AcTime
 fi

 bw_tool -I -D /dev/i2c-1 -a 94 -w 11:00
  ./$BUTTON

  sleep 1
done
For this I used the same script I explained in Blog 10. Only difference is that he opens other scripts.
Script TimeAndAlarm
#!/bin/bash

Min=$(cat Minutes)
Hr=$(cat Hours)

   bw_tool -I -D /dev/i2c-1 -a 94 -w 10:00
   bw_tool -I -D /dev/i2c-1 -a 94 -w 11:00
   bw_tool -I -D /dev/i2c-1 -a 94 -t "Alarm " $(printf %02d $Hr)":"$(printf %02d $Min)

   bw_tool -I -D /dev/i2c-1 -a 94 -w 11:20
   bw_tool -I -D /dev/i2c-1 -a 94 -t "Time   "`date +%T`
The script will read the given minutes and hours:
Min=$(cat Minutes)
Hr=$(cat Hours)
The read minutes and hours will then be printed on the display.
bw_tool -I -D /dev/i2c-1 -a 94 -t "Alarm " $(printf %02d $Hr)":"$(printf %02d $Min)
Script CrontimeHH
#!/bin/bash

bw_tool -I -D /dev/i2c-1 -a 94 -w 10:00

while true; do
 Scan=`bw_tool -I -D /dev/i2c-1 -a 94 -R 30:b`

 if [ $Scan  != "00" ]; then
   bw_tool -I -D /dev/i2c-1 -a 94 -w 10:00
 fi

 if [ $Scan  = "20" ]; then
   bw_tool -I -D /dev/i2c-1 -a 94 -w 10:00
   TimeOnhh=$(( (TimeOnhh + 01) %  24   ))
 fi

 if [ $Scan  = "10" ]; then
   bw_tool -I -D /dev/i2c-1 -a 94 -w 10:00
   TimeOnhh=$(( (TimeOnhh + 23) %   24  ))
 fi

 if [ $Scan  = "08" ]; then
   bw_tool -I -D /dev/i2c-1 -a 94 -w 10:00
   TimeOnhh=$(( (TimeOnhh + 05) %   24  ))
 fi

 if [ $Scan  = "04" ]; then
   bw_tool -I -D /dev/i2c-1 -a 94 -w 10:00
   TimeOnhh=$(( (TimeOnhh + 19) %   24  ))
 fi

 if [ $Scan  = "02" ]; then
   bw_tool -I -D /dev/i2c-1 -a 94 -w 10:00
   echo $TimeOnhh > Hours
   bw_tool -I -D /dev/i2c-1 -a 94 -w 11:20
   bw_tool -I -D /dev/i2c-1 -a 94 -t "Set!"
   sleep 1
 fi

 if [ $Scan  = "01" ]; then
   exit
 fi

 bw_tool -I -D /dev/i2c-1 -a 94 -w 11:00
 bw_tool -I -D /dev/i2c-1 -a 94 -t "Hours "$(printf %02d $TimeOnhh)
 bw_tool -I -D /dev/i2c-1 -a 94 -w 11:20
 bw_tool -I -D /dev/i2c-1 -a 94 -t "Time  "`date +%T`

  sleep 1

done
Like the AlarmMenu it uses the same script as from Blog 10. Only what is special is:
echo $TimeOnhh > Hours
Which sends the given hour number to a folder named Hours.
CrontimeMM
This works the same as CrontimeHH, only
- TimeOnhh is changed to TimeOnmm
- Hours is changed to Min
Script AcTime
#!/bin/bash

Min=$(cat Minutes)
Hr=$(cat Hours)

(echo "#  mm hh dom mon dow command"; echo ""$Min" "$Hr" * * * mplayer /home/pi/ru.mp3") | crontab

bw_tool -I -D /dev/i2c-1 -a 94 -w 11:00
bw_tool -I -D /dev/i2c-1 -a 94 -t "Activated "
bw_tool -I -D /dev/i2c-1 -a 94 -w 11:20
bw_tool -I -D /dev/i2c-1 -a 94 -t "If times set"
The script read the minutes and hours given.
Min=$(cat Minutes)
Hr=$(cat Hours)
After that it puts the times in the crontab.
(echo "# mm hh dom mon dow command"; echo ""$Min" "$Hr" * * * mplayer /home/pi/ru.mp3") | crontab
Script StopSong
#!/bin/bash

killall mplayer
This will end all the mplayer files that are running.
Script ResetAlarm
#!/bin/bash

Min="99"
Hr="99"

echo $Min > Hours
echo $Hr > Minutes

(echo "#  mm hh dom mon dow command"; echo ""$Min" "$Hr" * * * mplayer /home/pi/ru.mp3") | crontab
   bw_tool -I -D /dev/i2c-1 -a 94 -w 10:00
   bw_tool -I -D /dev/i2c-1 -a 94 -w 11:00
   bw_tool -I -D /dev/i2c-1 -a 94 -t "Alarm " "$Hr":"$Min" "Res"
   bw_tool -I -D /dev/i2c-1 -a 94 -w 11:20
   bw_tool -I -D /dev/i2c-1 -a 94 -t "Time   "`date +%T`
Min="99"
Hr="99"
Will change the time, when the alarm goes to 99. ( A time that of course never get reached )
echo $Min > Hours
echo $Hr > Minutes
This is to save the times in the Hours and Minutes folder. So that if the time normally get showed everybody will see 99:99 as time. ( And not 00:00! I don't want to confuse people)
(echo "# mm hh dom mon dow command"; echo ""$Min" "$Hr" * * * mplayer /home/pi/ru.mp3") | crontab
Then it will put the times in the crontab and prints them out on the display.

