Difference between revisions of "Blog 22"
| Line 50: | Line 50: | ||
|} |
|} |
||
For more information about the pin layout see: [[DIO]] & [[I2C connector pinout]] |
|||
== Simple Example code == |
== Simple Example code == |
||
Revision as of 13:16, 28 December 2015
!BETA!
Hardware used on Arduino:
- DIO | (DIO)
- Jumper cables M-F
- 4 PIN I2C cable F-F
- Analog meter
Programmed with:
- Arduino
- Time Library
- Processing
Connecting the analog meter
Connection between DIO and Arduino:
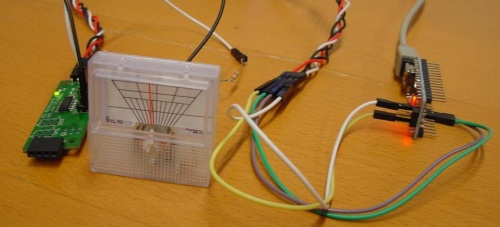
For this project I had the some what the same connection with my previous 7FETs Stepper Motor projects. I put Jumper cables M-F on A4, A5, VCC and GND. Those cables where connected through a 4 PIN I2C cable with the DIO. The way they are connection is as followed:
| DIO PIN | ARDUINO PIN |
|---|---|
| 1(White) | GND |
| 2 | A4 |
| 3 | A5 |
| 4(Red) | VCC |
Connection between DIO and analog meter
I connected the power and ground from the analog meter with a male-female jumper cable. The Ground from the analog meter is connected with pin 1. The power from the analog meter is connected with pin 3. ( What is the first IO ) The power cable is has two resistors connected on it, because even with low PWM values the pointer already went to it's maximum.
The connector pin layout on the DIO:
| 2 | 4 | 6 | 8 | 10 |
| 1 | 3 | 5 | 7 | 9 |
For more information about the pin layout see: DIO & I2C connector pinout
Simple Example code
In this code I will show how you can make the Analog meter pointer, be at 50% for ten seconds and being off for 10 seconds. It is just easy code to use to check if the connection works between meter, dio and arduino.
#define DIO 0x42
#include <Wire.h>

void setup()
{
  Wire.begin(); // wake up I2C bus
  Serial.begin(9600);
  set_var(0x42, 0x30, 0x01);
  set_var(0x42, 0x5f, 0x01);
}

byte get_var(byte address, byte reg)
{
  byte value;
  Wire.beginTransmission(address);
  Wire.write(reg);
  Wire.endTransmission();
  delayMicroseconds (10);
  Wire.requestFrom(DIO, 1);
  value = Wire.read();
  return value;
}

void set_var(byte address, byte reg, byte value)
{
  Wire.beginTransmission(address);
  delayMicroseconds  (10);
  Wire.write(reg);
  delayMicroseconds  (10);
  Wire.write(value);
  Wire.endTransmission();
}

void loop()
{
  unsigned long DIOAddress;

  char buf[32];
  set_var(0x42, 0x50, 0x80);

  DIOAddress = get_var(0x50, 0xb);
  sprintf (buf, "PWM80:  A:%d \r\n", DIOAddress);
  Serial.write (buf);

 delay(10000);

  set_var(0x42, 0x50, 0x00);

  DIOAddress = get_var(0x50, 0xb);
  sprintf (buf, "PWM0 :  A:%d \r\n", DIOAddress);
  Serial.write (buf);

 delay(10000);
 }
DIO Analog Meter - Clock
In this project I made the Arduino version of the clock. What it does is that it read how late it is, and with the time it calculate how much PWM the meter should get to point to the right hour.
The Full script can be found here: Link The file has the name: DIO_CLOCK_ARDUINO2.ino
This script I used for editing is the TimeSerial script( Examples -> Time ), that you get when you download the Time Library. The Time Library is required, when you want to work with time on your Arduino.
Important stuff that is added:
#include <Time.h>
#define DIO 0x42
#include <Wire.h>

void setup()  {
Wire.begin();
set_var(0x42, 0x30, 0x01);
set_var(0x42, 0x5f, 0x01);
}

unsigned long DIOAddress;
byte CurrentHour = hour();
int HourMax = 11;
int HexMax = 255;
byte Pwm;
byte NewHour;

Serial.print("\r\nCurrent Hour ");
Serial.print(CurrentHour);

if (CurrentHour >= HourMax) {
  NewHour = CurrentHour - 12;
}

// NewHour = NewHour + 2;
Serial.print("\r\nNew Hour ");
Serial.print(NewHour);

Pwm = NewHour * HexMax / HourMax;
Serial.print("\r\n Decimal      ");
Serial.print(Pwm, DEC);
Serial.print("\r\n Hexadecimal  ");
Serial.print(Pwm, HEX);
set_var(0x42, 0x50, Pwm);

DIOAddress = get_var(0x50, 0xb);
Serial.print("\r\n PWM: ");
Serial.print(DIOAddress, HEX);
DIO Analog Meter - Timer
In this project I made a timer for the Arduino. What it does is with the given amount of seconds the analog meter will go from the maximum PWM state(FF) to it's lowest PWM state(zero). The anolog meter is then used as timer, where you can read of how long you have to wait.
Full code: Link
This script I edited for making this script is the TimeSerial script( Examples -> Time ). This script you get when you download the Time Library. The Time Library is required, when you want to work with time on your Arduino. Parts that I added, that I will give some explanation:
#include <Time.h>
#define DIO 0x42
#include <Wire.h>

int EndSec;
int SecValue = 30;
int HexMax = 255;
int FirstSec = second();

void setup()  {
Wire.begin();
set_var(0x42, 0x30, 0x01);
set_var(0x42, 0x5f, 0x01);
EndSec = FirstSec + SecValue;
}

void digitalClockDisplay(){

  unsigned long DIOAddress;
  byte CurrentSec = second();
  byte PwmValue;
  int Progress;

  Serial.print("\r\nCurrent Sec ");
  Serial.print(CurrentSec);

  Progress = EndSec - CurrentSec;
  Serial.print("\r\nProgress ");
  Serial.print(Progress);

  PwmValue = Progress * HexMax / SecValue;
  Serial.print("\r\n Hexadecimal  ");
  Serial.print(PwmValue, HEX);

  set_var(0x42, 0x50, PwmValue);

  DIOAddress = get_var(0x50, 0xb);
  Serial.print("\r\n PWM: ");
  Serial.print(DIOAddress, HEX);

}
Useful links
- DIO
- DIO protocol
- I2C connector pinout
- Blog 21 - The Raspberry Pi Version of the above projects.
- Guide from oopsohno: How to get the arduino time library up and going
- Blog list
